Adobe Photoshop Learning

Welcome to World Editing Photo

  • RSS
  • Delicious
  • Facebook
  • Twitter

Popular Posts

Magic Bird
Frog New Version
Magic Pigeon

Click Here

Home

Ads

Total Pageviews

Popular Posts

Thumbnail Recent Post

Blog Archive

Followers

Photoshop Manipulation Blog

Photoshop Manipulation Blog is the best blog for you to choose as a guideline to follow how to edit your photo. There are many simple tutorials I create for you and not take a your time to read the steps ...

Organizer

This blog organize by Azli from Penang, Malaysia. I'm try to give a best tutorial with simple step for you to follow it. If you have a problem, about the tutorials or step you can comment directly at my box comment below the tutorial. Hopefully I can help you. Thanks ...

Visitor

Thanks to all because give your time to view my blog. The blog always update by admin everyday. If you want to see a new tutorials, this is the best website for you to see everyday. If you want to share your own idea, you can leave a comment and give your address website ...

Appreciation

Thanks for all visitor especially my beloved friend Miss Jiji who always supported me whatever I doing. Thanks, also to my family and visitor. Click at the promote ads as a point you all supported me, Thanks ...

Issues and Problems

I'm very sorry, if my tutorials or my photos edited make you feel down and cross your sensitivity. I try to improves or change it directly if I think the photos can make a controversy ...

Click Here


Final Image


Original Image

Step 1

Open the pic and duplicate the layer. Press Ctrl + J

Step 2

Add Layer Mask.

Step 3

Click at layer mask, then Go to Image > Apply Image

Step 4

At the same layer, Change mode Normal to Screen

Step 5

Duplicate the layer. Press Ctrl + J

Step 6

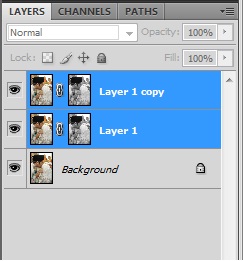
I want group the layer. First press Ctrl and click at the layer. Like this:

then go to Layer > Group Layer

You can see like this:

Step 7

Click at Layer 1, Go to Filter > Blur > Motion Blur. Setup like that:
then click OK

then for Layer 1 copy. Repeat the step 7. Go to Filter > Blur > Motion Blur. Just change the angle 45. Previously -45.

Step 8

Sharpen the diffusion. Click at Layer 1, go to Filter > Sharpen > Unsharp Mask

Repeat the step at Layer 1 copy.

Step 9

At the Group 1, Create layer mask and then fill it with black background. After that go to eraser, choose soft eraser 100. Erase background

for eraser size for erase the background photo.

Actually you are already finish. If you want more best view, click at layer 1 & layer 1 copy, then go to Image > Adjustment > Hue Saturation..Setup with your creativity.


Final Image

One Response so far.

  1. Unknown says:

    The subject of wedding photo editing has been covered intensively by the world press over the past decade. There are many factors which influenced the development of photo retouch. Remarkably photo retouch is heralded by shopkeepers and investment bankers alike, leading many to state that it is impossible to overestimate its impact on modern thought.

Leave a Reply