


Some people know how to edit picture BUT when him/her go to photo shop to print the images, the printer can't print all of views the images. Waste your time to edited the pictures but the printer machine can't print. Maybe 85% of picture only printer can view & print.
1. Today, I want to give a simple tutorial how to setup of photos size (2R, 3R, 4R,
5R, 6R and.....12R).

Adobe Photoshop. Go to "File" click "New"

frame size. (width and height). In this tutorial I choose the 4R photos size
(4 x 6 inch). Click OK. Finish...
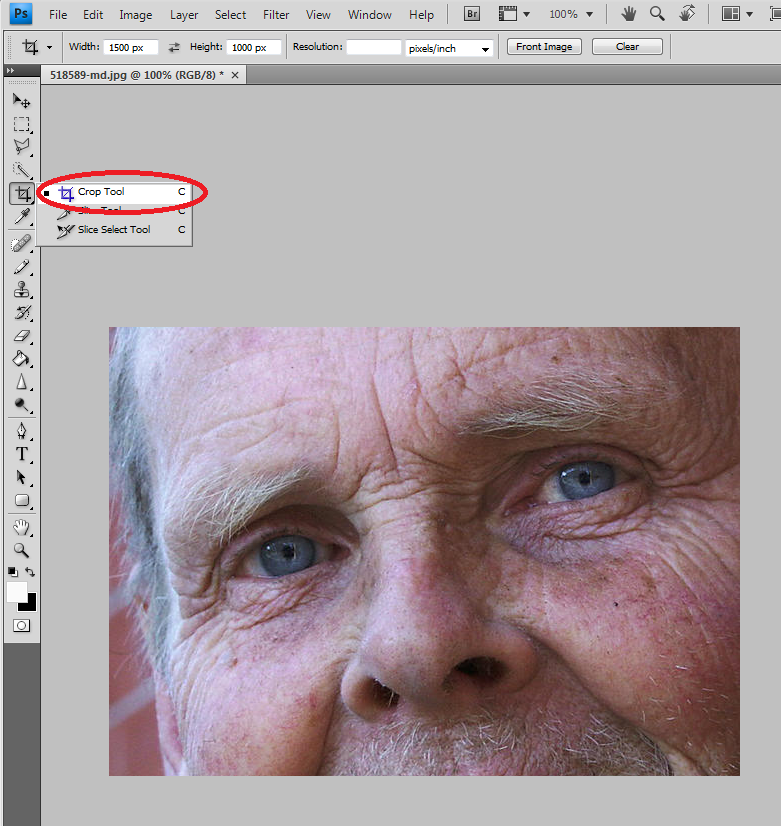
4. For who want to setup the existing images, after you open the picture, you can
choose the "Crop"

size is 4 x 6 inch.

can print directly without adjust again the frame size. Good Luck..
7. Frame size for photo.
It's helpful. Thank you :)
Thanks😂😁
Thank you so much it was very helpful
Ağrı
Diyarbakır
Bolu
Elazığ
Siirt
KRQWA
Antalya
Konya
Adana
Ankara
Van
6İHC8
görüntülüshow
ücretli show
L3H
https://titandijital.com.tr/
balıkesir parça eşya taşıma
eskişehir parça eşya taşıma
ardahan parça eşya taşıma
muş parça eşya taşıma
VVK
kocaeli evden eve nakliyat
kilis evden eve nakliyat
bursa evden eve nakliyat
trabzon evden eve nakliyat
hakkari evden eve nakliyat
YOWK
siirt evden eve nakliyat
adıyaman evden eve nakliyat
kastamonu evden eve nakliyat
artvin evden eve nakliyat
malatya evden eve nakliyat
DİU
C027D
Ordu Evden Eve Nakliyat
Tokat Evden Eve Nakliyat
Kocaeli Evden Eve Nakliyat
Ardahan Evden Eve Nakliyat
Samsun Evden Eve Nakliyat
96F3A
Denizli Evden Eve Nakliyat
Çankırı Evden Eve Nakliyat
Bolu Evden Eve Nakliyat
Ankara Evden Eve Nakliyat
Kocaeli Evden Eve Nakliyat
7200A
Bilecik Evden Eve Nakliyat
Samsun Lojistik
Ünye Çelik Kapı
Bingöl Şehir İçi Nakliyat
Amasya Lojistik
Gölbaşı Parke Ustası
Kırklareli Parça Eşya Taşıma
Kars Parça Eşya Taşıma
Yalova Şehirler Arası Nakliyat
9B973
Şırnak Evden Eve Nakliyat
anapolon oxymetholone for sale
Çerkezköy Parke Ustası
primobolan
Diyarbakır Evden Eve Nakliyat
Eskişehir Evden Eve Nakliyat
Binance Referans Kodu
turinabol
Bursa Evden Eve Nakliyat
74E7C
referans
CC4C5
Facebook Grup Üyesi Hilesi
Binance Referans Kodu
Görüntülü Sohbet Parasız
Gate io Borsası Güvenilir mi
Kripto Para Çıkarma
Telegram Abone Hilesi
Coin Nasıl Alınır
Jns Coin Hangi Borsada
Facebook Takipçi Hilesi
054B0
Sui Coin Hangi Borsada
Bitcoin Nasıl Para Kazanılır
Sonm Coin Hangi Borsada
Twitch Takipçi Satın Al
Baby Doge Coin Hangi Borsada
Parasız Görüntülü Sohbet
Sohbet
Facebook Sayfa Beğeni Satın Al
Kripto Para Nedir
180FD
sushiswap
shapeshift
zkswap
pancakeswap
yearn finance
DefiLlama
satoshivm
quickswap
pudgy penguins
7F05F
Göle
Salihli
Kırşehir
Uzundere
Kemaliye
https://izmirkizlari.com
Gördes
Alucra
Kozluk
ZDFGBXTHJMK
شركة تسليك مجاري بالهفوف
شركة مكافحة حشرات بالدمام SFmCxRqmxB
شركة مكافحة حشرات 8OzUUnwijc
شركة مكافحة الحشرات بالاحساء dA92RKfhUD
شركة تنظيف خزانات بابها x7QPnurRqQ
شركة عزل اسطح بالجبيل CwFM2SKOHV
شركة تنظيف شقق بالاحساء d5l9E0jfSe
A080AB6CB5
instagram düşmeyen takipçi
AB5DBB3914
instagram türk gerçek takipçi
3D918747B3
takipci satin al guvenilir
E5262BEF19
twitter takipci satin alma
071044B7AB
Anadoluslot
Anadoluslot
Anadoluslot Güncel Giriş Adresi
Anadoluslot
Trwin
Trwin
Trwin Giriş
Trwin
Trwin Güncel Giriş Adresi
137F6CB5B4
ig takipçi satın al
Whiteout Survival Hediye Kodu
Pubg Hassasiyet Kodu
Google Yorum Satın Al
Avast Etkinleştirme Kodu
Zula Hediye Kodu
Pasha Fencer Hediye Kodu
MLBB Hediye Kodu
Footer Link Satın Al
شركة انشاء وتنظيف مسابح بجازان mfuv5savgv
8FF846731F
Telegram Farm Botları
Telegram Coin Botları
Telegram Mining Botları
Telegram Para Kazanma Grupları
Binance Hesap Açma
شركة مكافحة الحمام بالاحساء
dVENVzHPXE
شركة تسليك مجاري بالظهران
aqtDeYSWUn
شركة عزل اسطح بالجبيل
PaJdmfqOeN
E4BD861E9E
fake takipçi
tiktok beğeni satın al
gerçek takipçi
yabancı takipçi
fake takipçi
شركة تنظيف افران بالمدينة المنورة
EzSDgMVzgVro